You may have heard the news that our latest product Timeline 2.0 has hit the stores, and with a completely free version it is time to write out the easiest way to get your backups done.
Step 1: Get yourself an USB External Storage device
An external Hard Drive is the best form of media to create backups on, it is widely available, becoming increasingly cheap and is very durable and simple to setup. You can get any brand of external hard drives such as WesternDigital, Lacie, Seagate, Toshiba or other brands with a 1TB capacity for as low as $80.
Setting up your hard drive is easy, connect your external hard drive to the USB port, plug it in and you should be able to see it under my computer in a little while after Windows detects the new hardware and automatically recognizes it and installs it. External hard drives can also be connected through Firewire and eSATA connecters and Timeline will be able to pick them up automatically.
Step2: Setup your backup
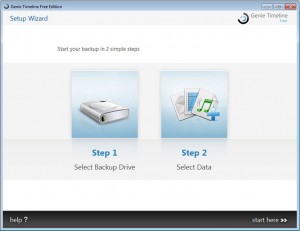
Okay, now that you have your hard drive setup and want to begin your backup, download Timeline and install it. As soon as the program finishes the setup you will be presented with the first screen which is the “Backup Setup Wizard” click next to select your backup drive.

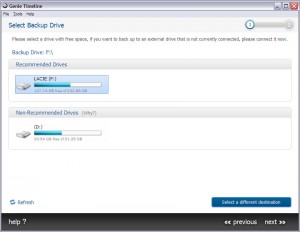
Timeline will automatically detect your new hard drive and you
will be able to select it by pressing on it and then pressing next, Timeline also shows all the drives that you have available and recommends what drives to select. If you are using a wireless hard drive you will have to use “Select a different destination” and browse for your hard drive.

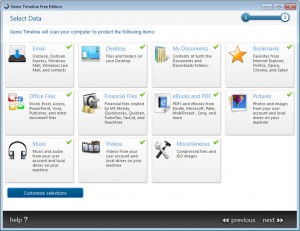
Next step is the “Select Data” page, Timeline by default will include all smart selections which include your email, documents, desktop, office files, financial files, eBooks and PDF’s, internet bookmarks, pictures, music and videos and scan for them automatically, if you feel there are a couple of these selections that you do not need in your backup press the “Customize selections button” and uncheck them.

If you are using the professional or home version of Timeline the last step includes more backup options such as compression to reduce backup size and encryption to enforce security on your files.
That’s it! You’re all set, just sit back and watch your protection level increase. If Timeline detects a large number of files it may take a while to finish the initial backup which is why it is recommended to leave your pc on overnight, Timeline senses an idle pc and goes into Turbo mode for faster backups if you use your pc again Timeline will switch back to smart mode for a faster computer.
What impact will Timeline have on my machine?
After the initial backup is done, Genie Timeline will work silently in the background and will have no impact on your computers performance. If Timeline detects there are new files or your old files have changed it will periodically back them up.
